Tuesday, June 14, 2011

Guinness Chocolate and Brooklyn's Birthday

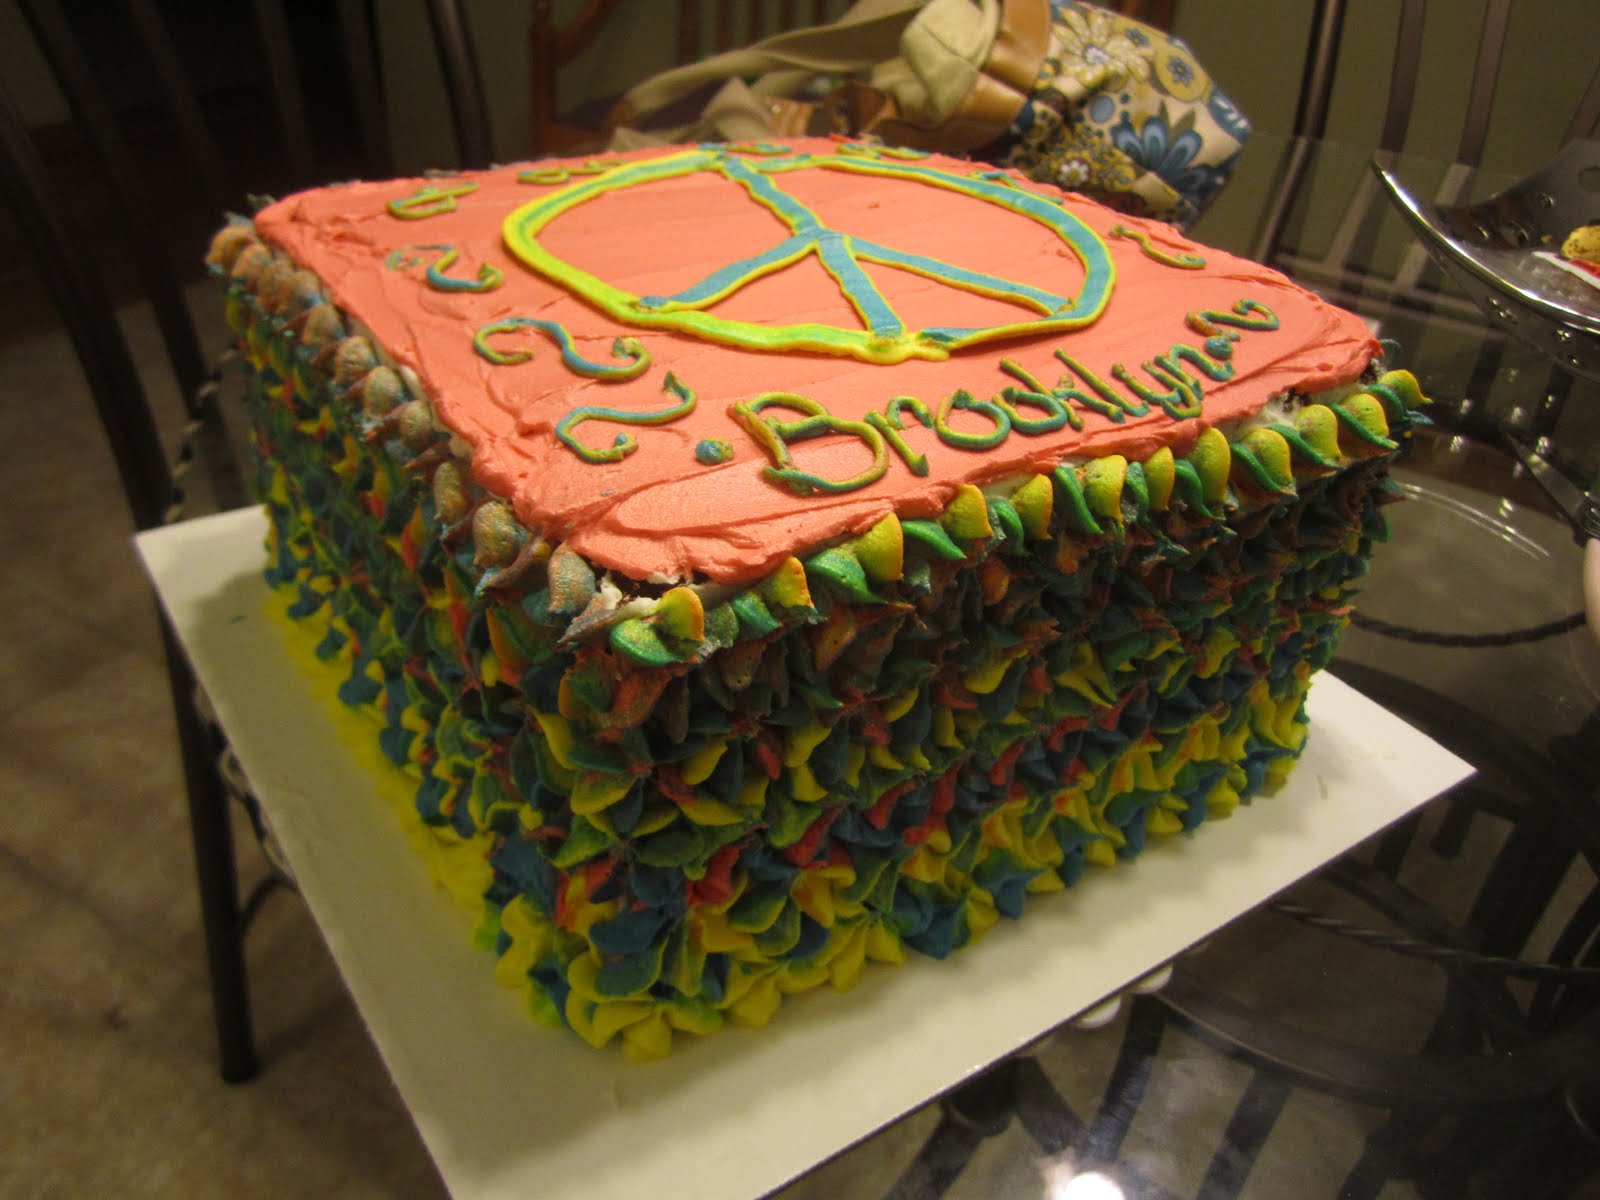
My lovely niece Brooklyn celebrated her birthday back in May but waited until June to have her party in Omaha at Fun-Plex. I was asked by my sister to make her a 'Mo-Mo cake'. Her favorite color is sky blue so I layered 4 9 inch cakes on top of one another alternating between blue cake and chocolate cake. I had a really busy week last week so I only had an hour here and an hour there to put the cake together. I didn't get to spend as much time on the decorating stage as I usually do but it turned out well considering my time constraints.


The colors unfortunately did not turn up very bright on my camera. Bad lighting...sorry!
It's very colorful 

Chocolate Guinness Cupcakes

Ingredients

  • 3/4 cup unsweetened cocoa, plus more for dusting finished cupcakes
  • 2 cups sugar
  • 2 cups all-purposeflour
  • 1 teaspoon baking soda
  • Pinch fine salt
  • 1 bottle stout beer (recommended: Guinness)
  • 1 stick butter, melted
  • 1 tablespoon vanilla extract
  • 3 large eggs
  • 3/4 cup sour cream 

Directions

Preheat oven to 350 degrees F.
In a large mixing bowl, whisk together the cocoa, sugar, flour, baking soda, and salt.

In another medium mixing bowl, combine the stout, melted butter, and vanilla. Beat in eggs, 1 at time. Mix in sour cream until thoroughly combined and smooth. Gradually mix the dry ingredients into the wet mixture.
Gotta love the yummy appearance of Guinness and dairy products 


Divide the batter equally between cupcake tins, filling each 3/4 full. Bake for about 12 minutes and then rotate the pans. Bake another 12 to 13 minutes until risen, nicely domed, and set in the middle but still soft and tender. Cool before turning out.


I topped the cupcakes with a cream cheese frosting and lightly dusted them with more cocoa powder. They are a nice balance of Guinness and chocolate flavors. I hope they go over well!

Friday, June 3, 2011

Traditional Dessert in a Cupcake!

My manager at Old Chicago, Howie, wanted me to figure how to make a dessert that tasted like the traditional banana pudding with Nilla wafers. There were so many ways to get this flavor into a cupcake. Should we use white cake with a banana frosting or filling? A banana cake with pudding? How could the Nilla wafers be incorporated. I think we talked about this cupcake numerous days until we decided how it needed to be done. I chose to do this with a Banana cupcake filled with vanilla pudding. I then used cream cheese frosting and dipped them into crushed up Nilla wafers and stuck a mini wafer on top for garnish. I haven't tried one yet because I ended up with a perfect 2 dozen but they do look really good!


Banana Cake Recipe

Ingredients

  • 1/2 cup shortening
  • 1 1/2 cups sugar
  • 2 eggs
  • 1 teaspoon vanilla extract
  • 1 cup mashed ripe bananas
  • 1/4 cup buttermilk
  • 2 cups all-purpose flour
  • 1 teaspoon baking powder
  • 3/4 teaspoon baking soda
  • 1/2 teaspoon salt

Directions

  1. In a large mixing bowl, cream shortening and sugar. Add the eggs, vanilla, bananas and buttermilk. Combine the flour, baking powder, baking soda and salt; add to banana mixture. Fill 18 paper-lined muffin cups two-thirds full.
  2. Bake at 350 degrees F for 15-20 minutes or until a toothpick comes out clean. Remove to wire racks to cool completely.

Seriously, could these cupcakes look any more perfect?!


I kind of cheated a little bit on the pudding and just used instant vanilla pudding because I happened to have some in my cabinet and honestly, when else would I use it

I took a large piping back with a serrated tip and stuck them in each cupcake and gave them each a good filling. It was the same technique I used when making my St. Patrick's Day cupcakes.

I then piped on some cream cheese frosting and dipped each cupcake in some crushed up Nilla wafers.

I then put one of the mini wafers onto each cupcake. I think they turned out really well. They were super easy to make and really fun coming up with the idea. I just hope they go over well but I'm sure they will!


Thursday, June 2, 2011

Lemon Raspberry Delight

My friend Shari, who is braving grad school with me, had her birthday this week. I figured in order to celebrate properly I thought she needed a cake! I asked her what she would like and she wanted something with either lemon and/ or raspberry so I gave her both all in one cake. I made a lemon raspberry cake with homemade lemon curd in between each layer. The cake was super yummy. It was originally from Epicurious and I found it on another blog but I changed it just a bit by not using blueberries and not making it a 3 layer cake. Instead I made two square 9 inch cakes and cut them in half layering them with lemon curd.


Ingredients
2 cups plus 6 tablespoons all-purpose flour
2 teaspoons baking powder
1 teaspoon salt
3 cups fresh blueberries ( in my case I used raspberries)
1/2 cup sour cream
1/2 cup whole milk
2 teaspoons vanilla extract
3/4 teaspoon pure lemon extract
1 teaspoon lemon zest
1 cup (2 sticks) unsalted butter, softened about 20 minutes out of refrigerator
1 1/2 cups white sugar
4 large eggs
Method
Preheat oven to 350°F. Prepare three 8″ round cake pans with parchment paper, butter and flour. Sift dry ingredients into medium bowl. Transfer 1 tablespoon flour mixture to larger bowl. Add fresh raspberries and toss to coat them with flour. Set remaining flour mixture and raspberries aside.

Stir whole milk, sour cream, vanilla extract, lemon extract and lemon zest in small bowl. In the bowl of a stand mixer, cream butter and sugar, until pale yellow and very fluffy, about 5 minutes. Beat in eggs one at a time, until well combined. Mix in flour mixture alternately with milk mixture, starting and ending with flour mixture. Stir until just combined. Gently fold in raspberries. Divide batter equally among 8″ round pans (or in my case two 9" square pans)


Bake cakes until toothpick inserted into centre comes out clean, about 25 minutes. Cool cakes in pans on racks for about 10 minutes, then invert onto racks until completely cool.


Zesty Lemon Frosting 

Ingredients
1 cup soft unsalted butter
2 teaspoons lemon zest
6 cups icing sugar
60 ml fresh lemon juice
6 tablespoons whipping cream
1/2 teaspoon pure lemon extract
2 tablespoons water
pinch salt

Method
Cream butter and lemon zest in bowl of electric mixer fitted with paddle attachment, about 3 minutes. Slowly add icing sugar, mixing on low speed for about 2 minutes. Add remaining ingredients and beat on med-high for 3-4 minutes until very fluffy. If using color gel, add a drop or two so that it isn't too bright.


In between each layer I made lemon curd. I used a recipe from Martha Stewart (Good ol' Martha, who doesn't love her). 

Ingredients

  • 3 large egg yolks, strained
  • Zest of 1/2 lemon
  • 1/4 cup lemon juice
  • 6 tablespoons sugar
  • 4 tablespoons unsalted butter, cold, cut into pieces

Directions

  1. Combine yolks, lemon zest, lemon juice, and sugar in a small saucepan. Whisk to combine. Set over medium heat, and stir constantly with a wooden spoon, making sure to stir sides and bottom of pan. Cook until mixture is thick enough to coat back of wooden spoon, 5 to 7 minutes.
  2. Remove saucepan from heat. Add butter, one piece at a time, stirring with the wooden spoon until consistency is smooth.

  3. Transfer mixture to a medium bowl. Lay a sheet of plastic wrap directly on the surface of the curd to avoid a skin from forming; wrap tightly. Let cool; refrigerate until firm and chilled, at least 1 hour.

    This recipe only makes about 1.5 cups per batch, if that, so I doubled the recipe. I probably could have tripled it without having much extra left over. It was very tart and delicious and added a lot to the cake. It was delicious. I just hope that Shari liked it!


Friday, May 27, 2011

Gooey Butter and some Citrus to boot!

As it has been a while since I did any extensive baking I decided to go a little crazy tonight. With the help of my lovely, long time friend Teresa we set upon making my kitchen a mess and creating just short of 100 cupcakes. Quite insane but a lot of fun. I couldn't for the life of me decide what to bake so I asked the world of Facebook whether I should make Strawberry Basil (which will happen eventually), Chocolate Peanut Butter Bacon, or Orange Lime. The overwhelming response was the Orange and Lime. I set upon finding a recipe and found one that added Chardonnay to the list. I figured it was worth a shot. However, I made the mistake of not reading the recipe throughly enough and realized only later that I did not own a blender, which I apparently needed. I made adaptations as I thought would work.

The recipe I found was:


Citrus Chardonnay Cupcakes
Cake Ingredients:
3 ¼ c. cake flour
1 c. room temp butter
2 ¼ c. sugar
2 t. baking powder
1 t. baking soda
4 eggs
2 t. vanilla
¼ t. salt
3 peeled Satsuma oranges
3 key limes, chopped and seeds removed
¼ c. chardonnay wine (recommended to use non-oak aged wine)
1 c. plain greek yogurt
3 T. key lime juice
3 peeled Satsuma oranges
1 c. brown sugar
Directions:
  • Preheat oven to 350 degrees
    Combine dry ingredients in a bowl.
  • In a blender combine satsumas, key limes, key lime juice, chardonnay, eggs, yogurt and blend until mixture is a milkshake like consistency.
  • In a separate bowl cream together sugar, butter and vanilla.
    Slowly mix blender mixture into butter sugar mixture and when that is mixed add
    dry ingredients and mix well.
  • Line the cupcake tins and place a Satsuma orange slice and ¼ t. at the bottom of each cup. Fill cups with the batter and bake on bottom rack 45 min or until done.
Frosting Ingredients:
8 oz. marscapone cheese
1 ½ c. confectionary sugar
¼ c. key lime juice
¼ c. chardonnay (recommended to use non-oak aged wine)
Directions:
Combine ingredients for frosting and refrigerate, use to frost cooled cupcakes.


I didn't use the fancy oranges and limes but substituted the normal varieties of each. Since I didn't have a blender I just put all the the ingredients I was supposed to blend into the mixer and put in the whisk and blended it for a while. I then put the mixture through a sieve and threw out all of the left overs. It worked out quite well. The first round I baked though fell a little bit but that was easily fixed by adding a bit more flour to the batter. They then turned out lovely. 

The frosting was very easy to make. I think the cupcakes were delicious and quite easy on the eyes. 


I topped the cupcakes off with candied orange and lime slices. They took a little bit of time to make but they were actually quite easy. With a little help from a How To article I was able to whip them up quickly. 


I did it! Go me!

Look at all those yummy cupcakes!!!

We were feeling adventurous and decided to make two varieties of cupcakes. Teresa had a stint in St. Louis and fell madly in love with something called Gooey Butter Cake. Apparently it is original to St. Louis and can really only be found there. She found a recipe and we set upon making them. They are a messy cupcake but very good indeed. I'm a fan for certain. 

Gooey Butter Cupcakes

St. Louis Gooey Butter Cake - United Cakes of America by Warren Brown

Dry Ingredients

All purpose flour - 12 ounces (2 1/2 cups)
Baking Powder - 1 1/2 tsp
Salt - 3/4 tsp

Wet Ingredients

Milk - 3/4 cup
Buttermilk - 3/4 cup
Vanilla Extract - 1 1/2 tsp

Creaming Ingredients

Unsalted Butter - 3 ounce (6 tbsp)
Vegetable Shortening - 3 ounces (6 tbsp)
Superfine granulated sugar - 15 ounces (2 cups less 2 tbsp)
Vanilla Bean, seed only - 1/2 bean
Eggs -  3

For the Topping

Cream Cheese - 8 ounces
Confectioners' sugar - 16 ounces (4 cups)
Vanilla Bean or Extract - 1 bean seeded or 1 tsp
Eggs - 3
Milk - 1/2 cup

Yield: One 12 inch round cake or 18 cupcakes


1. Preheat the oven to 335 F and place the rack in the centre.  Line the bottom of a 12 inch round cake pan with parchment or lightly coat a cupcake tray with non-stick oil-and-starch spray and place paper liners in the cups.  (I just sprayed the edges of the holes with easy bake spray before putting my cases in).

2. Measure the dry ingredients and wet ingredients into separate bowls. Whisk each to combine.

3. Measure the Butter, shortening, sugar and vanilla bean into the bowl of a free standing mixer fitted with a paddle attachment.  Combine on a medium to low speed for about 5 minutes.

4. Add the eggs one at a time to the creamed butter mixture, allowing each to fully incorporate before adding the next.

5. Alternately add the dry and wet ingredients about a quarter at a time.  Scrape the bowl to the bottom and mix for 20 seconds on a low speed.

6.  Scoop the batter into prepared pans.  (I filled the cupcake cases just under half full with this batter, when you top with the cheesecake batter you want the cupcake cases to end up about two thirds full, I have no idea if this is right the recipe doesn't specify, I might try a bit more cheesecake batter next time just to see).

7. In the bowl of a standing mixer fitted with a paddle attachment, beat the cream cheese on a medium speed until smooth, about 1 minute.  Add the rest of the ingredients (including any variations, see below) and mix for about 4 minutes.  Don't worry if  lumps of  cream cheese remain, they will disappear during baking.

8. Pour the mixture onto the cake batter in the cake pan or scoop it into the individual cupcake liners.  For the cupcakes, bake for 18-24 minutes; for the cake, bake for approximately 35 minutes, or until the sides are lightly browned and a wooden skewer inserted into the centre comes out with just a few crumbs on it.

9. Sprinkle the cakes or cupcakes with confectioners' sugar if you like before serving.

** I claim no ownership of this recipe **


We made quite a bit of cupcakes. I have quite a kitchen to clean up but it was well worth the mess. Hopefully my family and co workers will enjoy the cupcakes! 


Friday, May 13, 2011

Jon's Law School Graduation

Jon is finally graduating from Creighton Law School! I'm so very proud of him. It's a big accomplishment and he did an awesome job. To help us celebrate his graduation, his Mom, his sister Trina and his nephew Page are coming into town to attend the ceremony. I'm sure he'll look very smart in his robes :) We are having dinner with everyone (which will be the first time our parents actually meet, a whole 2 years later). This cake is a combination of his birthday cake (30!) and his graduation cake so of course he needed a coconut cake. Last year for his birthday I made him a coconut cake from a different recipe that actually had me breaking down my own coconut, including shredding it myself and baking both coconut milk and coconut cream. It was insane...and quite messy. This recipe is actually a recipe that my Mother uses all the time and insisted I use because of course hers is better, if nothing else it is easier and less sticky. I'm not a huge fan of coconut so I actually haven't had a slice of it in years but I know that everyone raves about it. I hope that trend continues tonight.


Coconut Layer Cake (care of Cook's Illustrated)

1 Large egg plus 5 large egg whites
3/4 C Cream of Coconut
1/4 C Water
1 t vanilla extract
1 t coconut extract
2 1/4 C Cake flour, sifted
1 C Sugar
1 T baking powder
3/4 t salt
12 T (1 1/2 stick) unsalted butter, cut into 12 pieces, softened, but still cool

2 cups packed (about 8 oz) sweetened shredded coconut

Buttercream
4 Large egg whites
1 C Sugar
Pinch salt
1 pound (4 sticks) unsalted butter, each stick cut into 6 pieces, softened, but still cool
1/4 C Cream of Coconut
1 t Coconut extract
1 t Vanilla extract


1. Adjust oven rack to lower middle position and heat the oven to 325 degrees. Grease 2 9" round cake pans.
2. Beat egg whites and whole egg in a large measuring cup with a fork to combine. Add cream of coconut, water, vanilla, and coconut extract and beat with fork until throughly combined.


3. Combine flour, sugar, baking powder and salt in bowl of stand mixer fitted with the paddle attachment. Mix on lowest speed to combine, about 30 seconds. With mixer still running on lowest speed, add butter one piece at a time, then beat until mixture resembles course meal with butter bits no larger than small peas, 2 to 2 1/2 minutes.


4. With mixer still running add 1 C liquid. Increase speed to medium- high and beat until light and fluffy, about 45 seconds. With mixer still running, add remaining 1 C liquid in steady stream (should take about 15 seconds) Stop mixer and scrape down sides then beat at medium high speed to combine. (Batter will be thick).


5. Divide between pans and level with offset or rubber spatula. Bake until deep golden brown, cakes pull away from sides of the pans and toothpick inserted into the center of the cake comes out clean, about 30 minutes. Do not turn off the oven.

To Toast the Coconut:
While cake cools, spread shredded coconut on a baking sheet; toast in oven until shreds are a mix of golden brown and white, about 15 minutes, stirring 2-3 times. Cool to room temperature.


And for the finish we use a buttercream frosting. This frosting is basically just coconut flavored butter and honestly how you could you go wrong! 

Buttercream:
1. Combine whites, sugar and salt in a bowl of stand mixer; set bowl over saucepan containing 1 1/2 inches of barely simmering water. Whisk constantly until mixture is opaque and warm to the touch and registers about 120 degrees, about 2 minutes.

2. Transfer bowl to  mixer and beat whites on high speed with whisk attachment until barely warm (80*) and whites are glossy and sticky, about 7 minutes. Reduce speed to medium high and beat in butter 1 piece at a time. Beat in cream of coconut, coconut and vanilla extracts. Scraps down sides of bowl and mix on medium high until well combined, about one minute. 

When I went to decorate the cake I cut each of the layers in half so that there were 4 layers total. I put two different pieces of parchment paper under the cake so that I could keep the cake stand clean while I was decorating the cake. When I went to put the coconut on the cake I put the stand in the middle of the sheet pan with the coconut on it so that the excess could just fall off. 

After the coconut was covering the sides I piped the scales of justice on Jon's cake since he is graduating from law school after all. I'm so very proud of everything he's done over the last 3 years! 


Congratulations Jon! It's been an eventful month...turned 30 and graduated from law school all in less than two weeks! The cake was a success. It is very delicate and doesn't over power you with coconut. Delicious!


Jon with his graduation present from Calvin. It's a bookmark that Calvin wrote Jon's name himself. Very cute!

Sunday, April 10, 2011

A Night at the Masquerade

I just wanted to start off by wishing one of my best friends, Tara, a wonderful 25th birthday today! We celebrated the day of her birth a night early last night and went out on the town all dressed up donning our masks. We fit in well due to the fact that there were scads of prom groups out as well. To help Tara celebrate her masquerade birthday I made her a cake to match. I really hoping she enjoyed it! It fit her theme and tasted yummy to boot.
Tara enjoying her cake in her lovely mask!

For this cake I used my favorite yellow cake recipe. It is great for a cake that needs to feed a lot of people. The recipe is originally for 2 9x13" pans, however I split it between 6 9" cake pans so my baking time is dramatically lowered than one the recipe calls for. 

Ingredients

  • 1 cup butter
  • 2 1/2 cups white sugar
  • 3 eggs
  • 1 1/2 teaspoons vanilla extract
  • 2 1/2 cups buttermilk
  • 3 3/4 cups all-purpose flour
  • 2 1/4 teaspoons baking powder
  • 2 1/2 teaspoons baking soda

Directions

  1. Preheat oven to 350 degrees F (175 degrees C). Grease and flour two 9x13 inch pans. Sift together the flour, baking powder and baking soda. Set aside.
  2. In a large bowl, cream together the butter and sugar until light and fluffy. Beat in the eggs one at a time, then stir in the vanilla. Beat in the flour mixture alternately with the buttermilk, mixing just until incorporated. Pour batter into prepared pans.
  3. Bake in the preheated oven for 35 to 40 minutes, or until a toothpick inserted into the center of the cake comes out clean. Allow to cool.

This is my go to recipe for a delicious cake. It is very dense but still very moist because it has so much buttermilk. So for this specific cake I split it evenly into three bowls so that I could individually color the layers. 
I then used colors that I thought would work well with the masquerade theme...
The batter ended up looking a little bit like this...
I baked 6 different layers. Two of each color. Since each pan only had about a cup and a half of batter in it, it only took about 15 minutes to bake each layer. 
After all of the layers cooled I stacked the cake with yellow frosting in the middle.
I then frosted the entire cake in a purple frosting. I used a bowl scraper to make the sides even with frosting. I let the cake then set in the fridge before I decorated the rest of the cake. 
For decorations I the cake I made roses out of butter cream in red and black. I also made gems and stars out of white chocolate with molds and sprayed them with an edible pearl dust so they looked more realistic. After I had all of these things ready to go it was just a matter of getting it all on the cake!


I think it turned out well. It would double well as a Phantom of the Opera cake with a different mask on top! I like how it turned out. The inside was also a colorful surprise!

All in all, happy birthday to Tara! I hope you had a great birthday. I had a great time and I thought we all looked amazing in our masks, including the cake.